優しいpymel氏 – スクリプト入門者のあなたへ 2-
2011/11/14
こんにちは。最近家も引っ越して会社も移転して毎日駅で迷子になっているsolです。
今回はpymelに関して簡単に紹介します。pymelはMaya2011から標準搭載され別途のインストールなしで使えるようになりました。
Pymelの一番の特徴はオブジェクト指向(object-oriented)に設計されている点です。
注意:(この記事の全てのコマンドは事前に以下のコマンドを実行しているのを前提とします)
1 2 | import maya.cmds as cmdsimport pymel.core as pm |
それでは早速比べてみると。
1 2 3 4 5 6 7 8 | cmds.ls('persp')[0]# Result: u'persp' #pm.ls('persp')[0]# Result: nt.Transform(u'persp') #type(cmds.ls('persp')[0])# Result: <type 'unicode'> # type(pm.ls('persp')[0])# Result: <class 'pymel.core.nodetypes.Transform'> # |
cmdsの場合はunicode(String)つまり文字を返して、pymelの場合はclass(オブジェクト)を返しています。
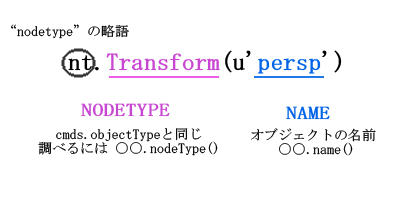
ここでnt.Transform(u’persp’)とは

さらに、どう違うか確認するため以下のコマンドでテストしてみましょう。
1 2 3 4 5 | sphereName = cmds.polySphere(n='cmdsSphere')cmds.rename(sphereName[0], 'newName1')cmds.select(sphereName[0])# Error: TypeError: file line 3: Object cmdsSphere is invalid ### 'cmdsSphere'という名前のオブジェクトがなくなったのでエラー発生 |
1 2 3 4 | sphereObject = pm.polySphere(n='pymelSphere')cmds.rename(sphereObject[0].name(), 'newName2')pm.select(sphereObject[0])## 実行成功 |
結果が違うのはcmdsの場合単純にSphereの名前(文字)を返していて、pymelはSphereのオブジェクトを返してるからです。
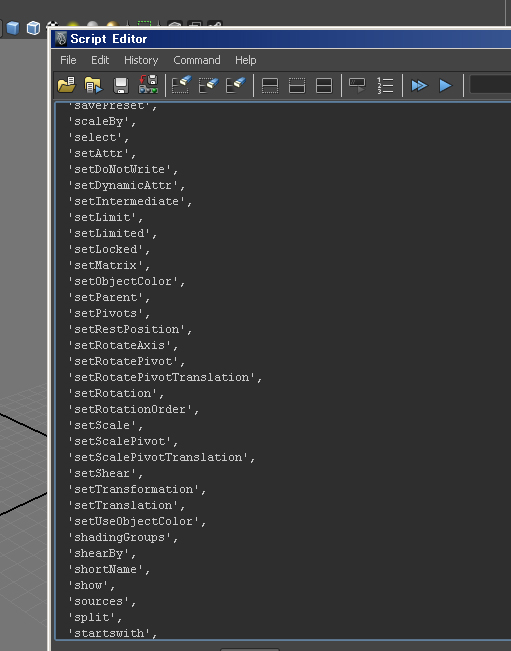
pymelのClassは色んなメソッドを持っていましてこのメソッドを使い色んな操作することができます。どんな機能を持っているかは調べてみるには以下のコマンドを実行します。
1 | dir(pm.ls('persp')[0]) |
それでは、直接使って見ましょう。テストのためPolygonSphereを一個作ります。
1 | cmds.polySphere(n='testSphere') |
testSphereからShapeノードを求めます。
1 2 3 | sphereObject = pm.ls('testSphere')[0]sphereObject.listRelatives(shapes=1)# Result: [nt.Mesh(u'testSphereShape')] # |
pymelのtransformクラスはもっと簡単なgetShapes()と言うコマンドを持っています。
1 2 | sphereObject.getShapes()# Result: [nt.Mesh(u'testSphereShape')] # |
次はtransformノードからShadingGroupを求めるのもコマンド一個でできます。
1 2 | pm.ls('testSphere')[0].shadingGroups()# Result: [nt.ShadingEngine(u'initialShadingGroup')] # |
pymelオブジェクトはMayaAPIの機能も一部持っています。
testSphereを適当に移動してWorld座標を求めてみます。
1 2 3 4 | pm.PyNode('testSphere').getTranslation('world')# Result: dt.Vector([-2.7148768132, 1.4959860627, 0.471570423749]) # pm.PyNode('testSphere').getTranslation('world')[0]# Result: -2.7148768131968191 # |
(pm.PyNodeを使うとunicodeからPymelオブジェクトがゲットできます)
ご覧の通りデータタイプVectorで返します。このvectorはMayaAPIのMVectorとほぼ同じことができます。
それでは、Vectorを利用して大嫌いな数学問題一つ解いてみます。

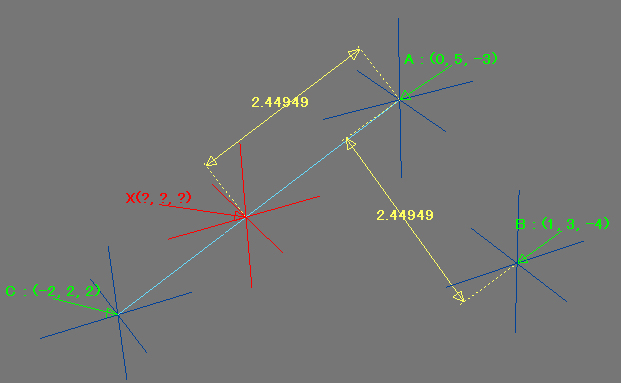
A,B,C点があり、AB間の距離と点Aから同じ距離にある直線AC上の点を求めてみましょう。
1 2 3 4 5 | aVector = pm.PyNode('A').getTranslation('world')bVector = pm.PyNode('B').getTranslation('world')cVector = pm.PyNode('C').getTranslation('world')newVector = (cVector - aVector).normal() * (bVector - aVector).length()+aVectorprint newVector |
以前、弊社の野澤が書いた記事テクスチャーのハードウェア表示などで紹介した内容をpymelで書いてみました。テクスチャーのハードウェアに表示がおかしくなった時表示を正しく直すスクリプトです。
1 2 3 4 5 6 7 8 9 10 11 12 13 14 15 16 17 18 19 20 21 22 23 24 25 26 27 28 29 30 31 32 33 34 | #チェック用の共通変数(リスト)checkedList = []#検索用関数def findTexture(target, targetName): #重複検索しないよう、targetをリストにいれておく checkedList.append(target) #fileノードでテクスチャパスに'COL'(targetName)という文字列が入っている場合は、returnして検索終了 if target.type() == 'file': if targetName in target.getAttr('fileTextureName'): return target #それ以外の場合、更にそこからのコネクションを検索 else: #ノードTypeを指定できるので、ここでは'gammaCorrect'と'file'を調べる for x in target.connections(t=('gammaCorrect', 'file')): #初めて見るノードの場合は再帰処理へまわす if not x in checkedList: result = findTexture(x, targetName) if result: return result#処理スタート (最初に選択したオブジェクトにのみ実行)matInfo = pm.ls(sl=1)[0].shadingGroups()[0].connections(t='materialInfo')[0]checkedList = [matInfo]success = Falsefor con in list(set(matInfo.connections())): textureFile = findTexture(con, 'COL') if textureFile: print u'// %sが見つかりました。'%textureFile.name() #テクスチャのmessageとmaterialInfoのtexture[0]をコネクトする #pymelの場合、'textureFile.message >> matInfo.texture[0]'と簡潔に書けたりもする textureFile.message.connect(matInfo.texture[0], f=1) success = True breakif not success: print '// テクスチャが見つかりませんでした。' |
使い方はテクスチャー表示がおかしくなっているオブジェクトを選択して実行してください。ここでは検索条件を「Textureの名前に’COL’文字がある」「検索するノードの種類 ‘gammaCorrect’, ‘file’」にしています。条件を変更したい場合は以下のように直してください。
ex) DIFという文字を探したい場合
1 | textureFile = findTexture(con, 'DIF') |
ex)検索するノード種類を追加したい場合
1 | for x in mat.connections(t=('gammaCorrect', 'file', 'checker', 'remapHsv', 'ramp')): |
最後に一つpymelを勉強するときのTIP
オブジェクトから正確な関数名を調べるときdir()コマンドを使いますが、
表示される結果があまりにも多いため読み難くなりがちです。と言うときのTIPです。
例えば、attributeに関するコマンドを探したい場合
1 2 | for x in dir(pm.PyNode('testSphere')): if 'ttr' in x: print x |
と言う風にすると欲しかったコマンドが見つけやすくなるかもしれません。
(attrではなくttrで検索するのはaが小文字の場合も大文字の場合もあるからです。)

今回はここまでです。それでは、また!


コメント
コメントフォーム