NukeでのPositionPass有効活用法
2016/11/14
前回の記事からだいぶ経ってしまいました、開発山口です。
今回はPosition Passを利用したDepth Passの作成方法を紹介したいと思います。
使い古されたネタかもしれませんがお付き合いください。
始めに
記事内の説明で使用しているNukeのシーンファイルですが、コピペしてシーン内に再現できるようにテキストを
用意しました。”expand source”をクリックしていただければ出てきますので記事と合わせて見てください。
※1度開いてしまうと閉じられないみたいなので、コピペが終わったらリロードしてください。
またNuke7.0以上のバージョンでお試しください。
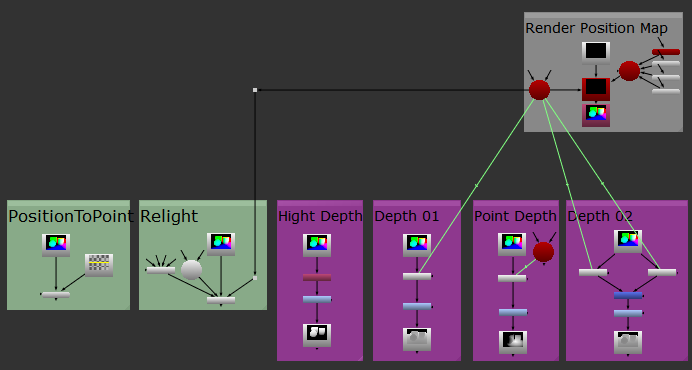
1 2 3 4 5 6 7 8 9 10 11 12 13 14 15 16 17 18 19 20 21 22 23 24 25 26 27 28 29 30 31 32 33 34 35 36 37 38 39 40 41 42 43 44 45 46 47 48 49 50 51 52 53 54 55 56 57 58 59 60 61 62 63 64 65 66 67 68 69 70 71 72 73 74 75 76 77 78 79 80 81 82 83 84 85 86 87 88 89 90 91 92 93 94 95 96 97 98 99 100 101 102 103 104 105 106 107 108 109 110 111 112 113 114 115 116 117 118 119 120 121 122 123 124 125 126 127 128 129 130 131 132 133 134 135 136 137 138 139 140 141 142 143 144 145 146 147 148 149 150 151 152 153 154 155 156 157 158 159 160 161 162 163 164 165 166 167 168 169 170 171 172 173 174 175 176 177 178 179 180 181 182 183 184 185 186 187 188 189 190 191 192 193 194 195 196 197 198 199 200 201 202 203 204 205 206 207 208 209 210 211 212 213 214 215 216 217 218 219 220 221 222 223 224 225 226 227 228 229 230 231 232 233 234 235 236 237 238 239 240 241 242 243 244 245 246 247 248 249 250 251 252 253 254 255 256 257 258 259 260 261 262 263 264 265 266 267 268 269 270 271 272 273 274 275 276 277 278 279 280 281 282 283 284 285 286 287 288 289 290 291 292 293 294 295 296 297 298 299 300 301 302 303 304 305 306 307 308 309 310 311 312 313 314 315 316 317 318 319 320 321 322 323 324 325 326 327 328 329 330 331 332 333 334 335 336 337 338 339 340 341 342 343 344 345 346 347 348 349 350 351 352 353 354 355 356 357 358 359 360 361 362 363 364 365 366 367 368 369 370 371 372 373 374 375 376 377 378 379 380 381 382 383 384 385 386 387 388 389 390 391 392 393 394 395 396 397 398 | BackdropNode { inputs 0 name BackdropNode1 tile_color 0x8e388e00 label "Hight Depth" note_font_size 42 xpos -1456 ypos -3373 bdwidth 243 bdheight 456}BackdropNode { inputs 0 name BackdropNode2 tile_color 0x8e388e00 label "Depth 02" note_font_size 42 xpos -638 ypos -3374 bdwidth 345 bdheight 455}BackdropNode { inputs 0 name BackdropNode3 tile_color 0x8e388e00 label "Depth 01" note_font_size 42 xpos -1183 ypos -3373 bdwidth 248 bdheight 455}BackdropNode { inputs 0 name BackdropNode4 tile_color 0x8e388e00 label "Point Depth" note_font_size 42 xpos -902 ypos -3373 bdwidth 243 bdheight 456}BackdropNode { inputs 0 name BackdropNode5 label "Render Position Map" note_font_size 42 xpos -757 ypos -3905 bdwidth 451 bdheight 337}BackdropNode { inputs 0 name BackdropNode6 tile_color 0x88aa88ff label Relight note_font_size 48 xpos -1846 ypos -3372 bdwidth 362 bdheight 312}BackdropNode { inputs 0 name BackdropNode7 tile_color 0x88aa88ff label PositionToPoint note_font_size 48 xpos -2218 ypos -3372 bdwidth 347 bdheight 312}push $cut_paste_inputAxis2 { name Axis xpos -730 ypos -3256}Camera2 { inputs 0 rot_order XZY translate {-3.731961727 3.420248747 5.088853359} rotate {-22.1907843 -28.86123413 -2.391627877} focal 26.5 haperture 26.5 vaperture 13.2 name renderCamera xpos -742 ypos -3715}set Nf88a9c00 [stack 0]Card2 { inputs 0 translate {0 -1.057815808e-007 -2.420000076} rotate {-90 0 0} scaling {20 20 20} control_points {3 3 3 61 {-0.5 -0.5 0} 0 {0.1666666865 0 0} 0 {0 0 0} 0 {0 0.1666666865 0} 0 {0 0 0} 0 {0 0 0}1 {0 -0.5 0} 0 {0.1666666716 0 0} 0 {-0.1666666716 0 0} 0 {0 0.1666666865 0} 0 {0 0 0} 0 {0.5 0 0}1 {0.5 -0.5 0} 0 {0 0 0} 0 {-0.1666666865 0 0} 0 {0 0.1666666865 0} 0 {0 0 0} 0 {1 0 0}1 {-0.5 0 0} 0 {0.1666666865 0 0} 0 {0 0 0} 0 {0 0.1666666716 0} 0 {0 -0.1666666716 0} 0 {0 0.5 0}1 {0 0 0} 0 {0.1666666716 0 0} 0 {-0.1666666716 0 0} 0 {0 0.1666666716 0} 0 {0 -0.1666666716 0} 0 {0.5 0.5 0}1 {0.5 0 0} 0 {0 0 0} 0 {-0.1666666865 0 0} 0 {0 0.1666666716 0} 0 {0 -0.1666666716 0} 0 {1 0.5 0}1 {-0.5 0.5 0} 0 {0.1666666865 0 0} 0 {0 0 0} 0 {0 0 0} 0 {0 -0.1666666865 0} 0 {0 1 0}1 {0 0.5 0} 0 {0.1666666716 0 0} 0 {-0.1666666716 0 0} 0 {0 0 0} 0 {0 -0.1666666865 0} 0 {0.5 1 0}1 {0.5 0.5 0} 0 {0 0 0} 0 {-0.1666666865 0 0} 0 {0 0 0} 0 {0 -0.1666666865 0} 0 {1 1 0} } name Card xpos -395 ypos -3804}Cube { inputs 0 cube {-6.119999886 -1.220000029 -1.379999995 -3.900000095 1.019999981 -3.319999933} translate {4.239999771 1.210000038 -0.3600000143} name Cube xpos -395 ypos -3769}Sphere { inputs 0 translate {-2.170000076 0.9399999976 0} name Sphere xpos -395 ypos -3729}Cylinder { inputs 0 close_top true close_bottom true translate {0.8500000238 0.9599999785 -0.1000000015} name Cylinder xpos -395 ypos -3690}Scene { inputs 4 name Scene xpos -489 ypos -3769}Constant { inputs 0 channels rgb format "640 480 0 0 640 480 1 PC_Video" name Constant xpos -592 ypos -3821}add_layer {position position.red position.green position.blue position.alpha}add_layer {normal normal.red normal.green normal.blue normal.alpha}ScanlineRender { inputs 3 output_shader_vectors true P_channel position N_channel normal name ScanlineRender xpos -592 ypos -3718 postage_stamp true}Shuffle { in position out rgb name Shuffle1 xpos -592 ypos -3646 postage_stamp true}set N88b9cc00 [stack 0]PostageStamp { name PostageStamp1 xpos -1383 ypos -3278 hide_input true postage_stamp true}Shuffle { red green blue green name Shuffle xpos -1383 ypos -3165}Grade { whitepoint 2 name set_range_hightDepth xpos -1383 ypos -3101}Premult { name Premult4 xpos -1383 ypos -3022 postage_stamp true}push $N88b9cc00PostageStamp { name PostageStamp3 xpos -503 ypos -3288 hide_input true postage_stamp true}set N1229e000 [stack 0]Expression { expr0 r-renderCamera.translate.x expr1 g-renderCamera.translate.y expr2 b-renderCamera.translate.z name make_pixcelVector xpos -601 ypos -3178}push $N1229e000Expression { expr0 -renderCamera.world_matrix.2 expr1 -renderCamera.world_matrix.6 expr2 -renderCamera.world_matrix.10 name make_cameraVector xpos -405 ypos -3177}MergeExpression { inputs 2 temp_name0 DotAB temp_expr0 (A.r*B.r+A.g*B.g+A.b*B.b) temp_name1 vecA_length temp_expr1 sqrt(A.r*A.r+A.g*A.g+A.b*A.b) temp_name2 vecB_length temp_expr2 sqrt(B.r*B.r+B.g*B.g+B.b*B.b) temp_name3 angle temp_expr3 acos(DotAB/(vecA_length*vecB_length)) channel0 rgb expr0 cos(angle)*vecA_length name make_distance xpos -502 ypos -3113}Grade { whitepoint 20 name set_range_depth2 xpos -502 ypos -3063}Premult { name Premult1 xpos -502 ypos -3003 postage_stamp true}push $N88b9cc00PostageStamp { name PostageStamp2 xpos -1099 ypos -3277 hide_input true postage_stamp true}Expression { temp_name0 x temp_expr0 r-renderCamera.translate.x temp_name1 y temp_expr1 g-renderCamera.translate.y temp_name2 z temp_expr2 b-renderCamera.translate.z temp_name3 length temp_expr3 sqrt(x*x+y*y+z*z) channel0 rgb expr0 length channel1 {-rgba.red -rgba.green -rgba.blue none} channel2 {-rgba.red -rgba.green -rgba.blue none} name make_pixcelVector1 xpos -1099 ypos -3167}Grade { whitepoint 20 name set_range_depth1 xpos -1099 ypos -3082}Premult { name Premult3 xpos -1099 ypos -3011 postage_stamp true}push $N88b9cc00PostageStamp { name PostageStamp4 xpos -829 ypos -3279 hide_input true postage_stamp true}Expression { temp_name0 x temp_expr0 r-Axis.translate.x temp_name1 y temp_expr1 g-Axis.translate.y temp_name2 z temp_expr2 b-Axis.translate.z temp_name3 length temp_expr3 sqrt(x*x+y*y+z*z) channel0 rgb expr0 length channel1 {-rgba.red -rgba.green -rgba.blue none} channel2 {-rgba.red -rgba.green -rgba.blue none} name make_pixcelVector2 xpos -829 ypos -3160}Grade { blackpoint 3 whitepoint 0 name set_range_pointDepth xpos -828 ypos -3065}Premult { name Premult2 xpos -828 ypos -3003 postage_stamp true}push $N88b9cc00PostageStamp { name PostageStamp6 xpos -2121 ypos -3278 hide_input true postage_stamp true}CheckerBoard2 { inputs 0 name CheckerBoard1 xpos -1998 ypos -3222}PositionToPoints2 { inputs 2 display textured render_mode textured cast_shadow false receive_shadow false P_channel rgb detail 0.255 pointSize 2.1 name PositionToPoints1 xpos -2121 ypos -3117}BasicMaterial { inputs 0 name BasicMaterial1 xpos -1824 ypos -3185}push $Nf88a9c00Dot { name Dot2 xpos -1524 ypos -3691}Dot { name Dot1 xpos -1524 ypos -3158}Light2 { inputs 0 intensity 2 translate {0.5 5.639999866 4.559999943} depthmap_slope_bias 0.01 name Light1 xpos -1726 ypos -3206}push $N88b9cc00PostageStamp { name PostageStamp5 xpos -1653 ypos -3281 hide_input true postage_stamp true}ReLight { inputs 4 normal normal position rgb name ReLight1 xpos -1653 ypos -3099} |
Position Passとは
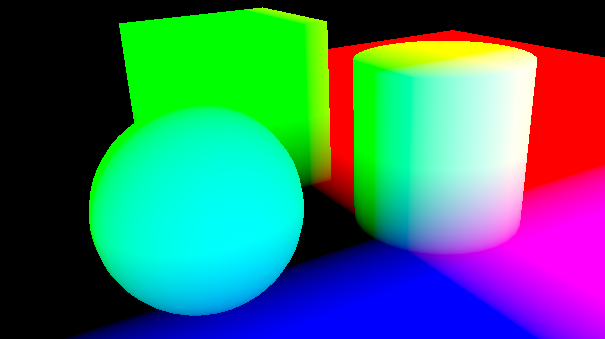
Position Passとは、各PixelのRGBに対し、オブジェクトのXYZ値を格納したPassです。
使い方は様々で、例えばNormal Passと組み合わせることで、影無しではありますが
簡易的なライティングをすることも可能です。
PositionToPointsノードを使用することで、各Pixelの位置を3D空間上でどこにあるか
調べることもできます。
このように様々な使用用途がある素材ですが、今回はこれを利用してNuke上でDepthを作成する
方法を紹介したいと思います。
Mayaからの出力
まずこのPassを作成する所から始めたいと思います。
Position Passはレンダラーで標準でサポートされているものも有りますが、今回は既存の
ノードを使用して出力してみたいと思います。
使用するレンダラーはmentalrayです
といっても、とても簡単でSurfaceShaderのOutColorにsamplerInfoノードのPoint Worldをつなぐだけです。
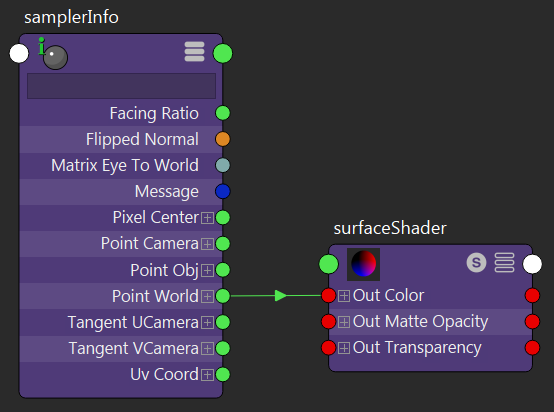
あとはこれでレンダリングするだけでPosition Passが出力できます。
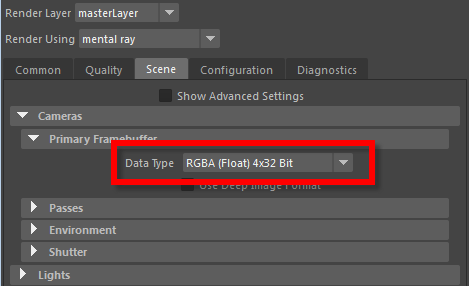
この際に気をつけてほしいのが出力設定で、必ず32bit floatで出力してください。
なぜこの設定がなぜこれでなければいけないのかは、次回あたりにでも記事にしたいと思います。
レンダリング結果をNukeで開き、各サーフェイスの値に1以上、0以下の値が入っていれば成功です。
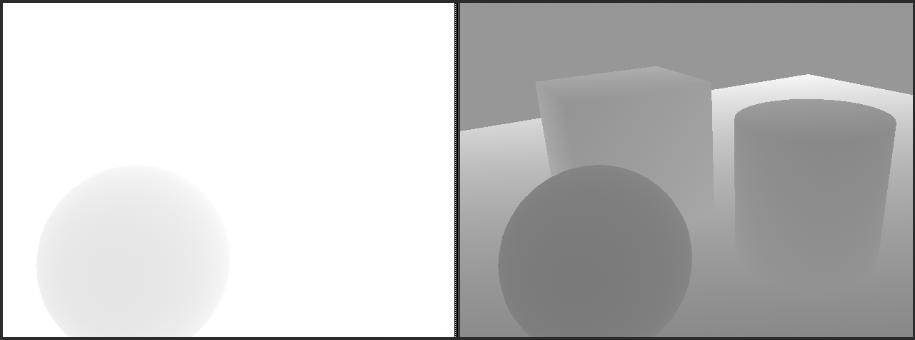
高さDepth
では早速Depthを作成していきます。
まず高さDepthです。これはとても簡単です。
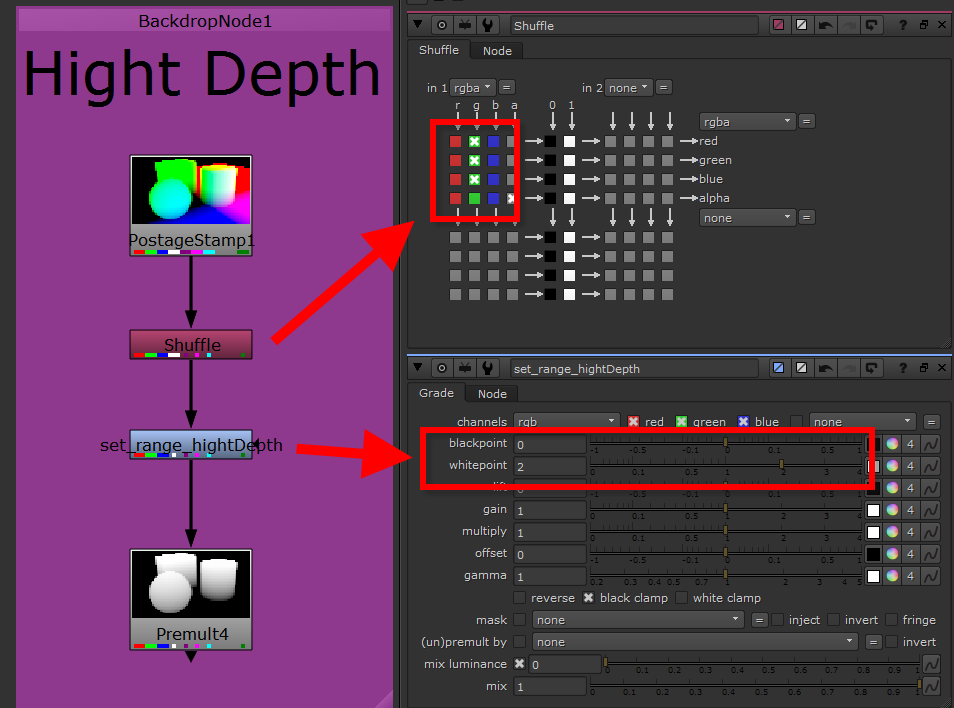
そもそもPosition PassにはGチャンネルに高さ情報が入っているので、これの
レンジを変えてあげるだけで簡単に作成できます。
ShuffleノードでGチャンネルだけ取り出し、GradeノードのBlackPointとWhitePointに
値を入れてあげるだけです。
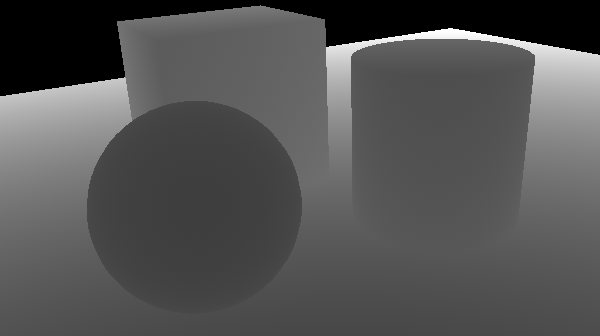
奥行きDepth01
次はカメラからのDepth素材です。
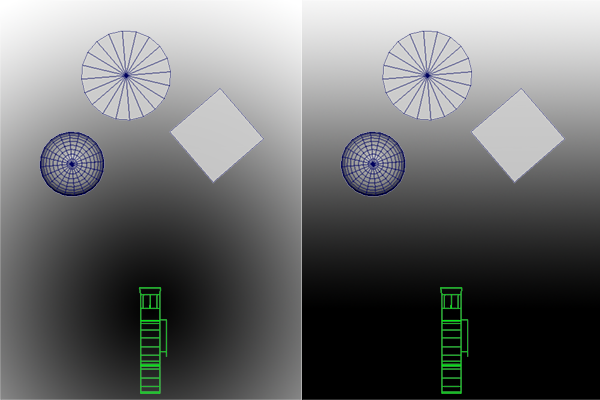
カメラからのDepth素材には円形のDepthと線形のDepthの2つがあります。
まず、簡単なほうの円形のDepthを紹介します。
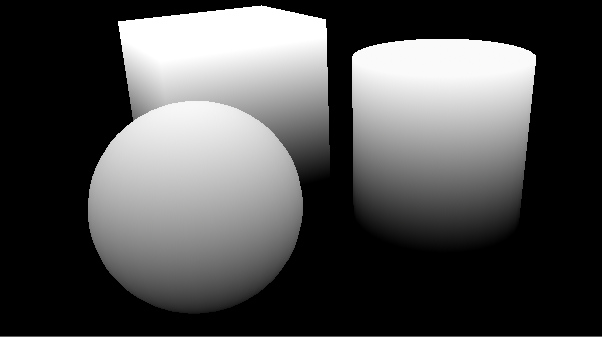
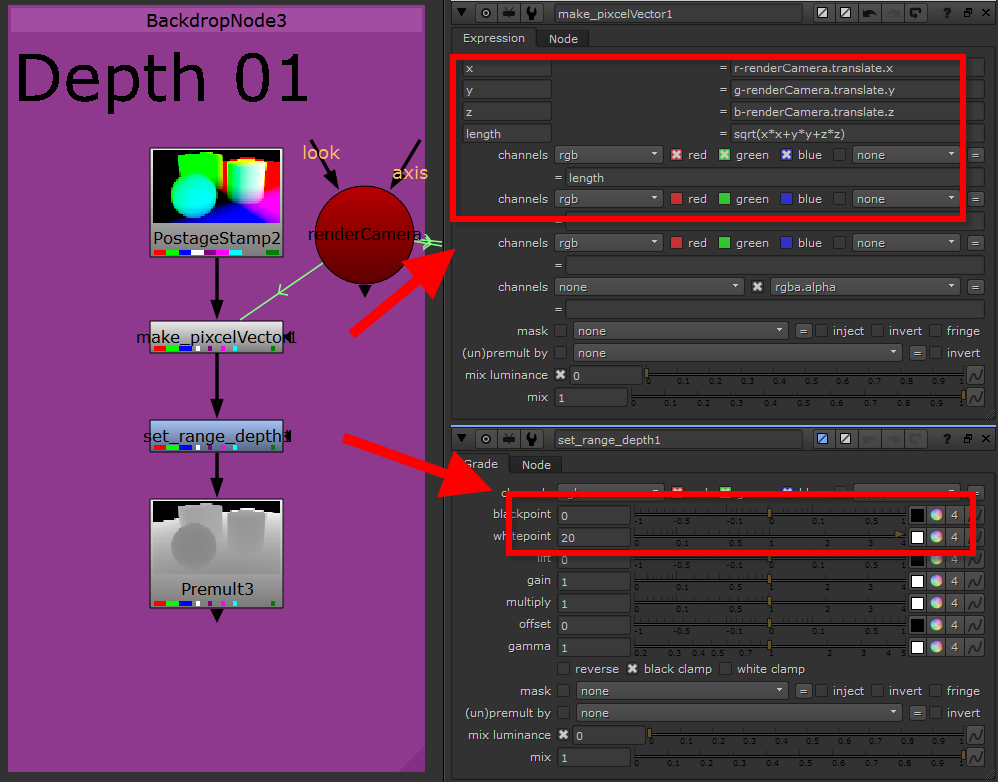
これも非常に簡単で各Pixelの位置情報からカメラの位置を引き算し、そのベクトルの距離を求め
レンジを調節してあげることで求めることができます。
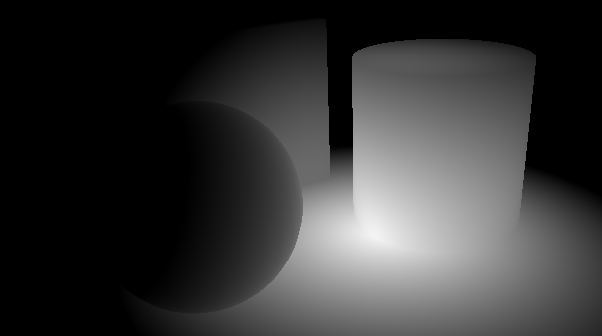
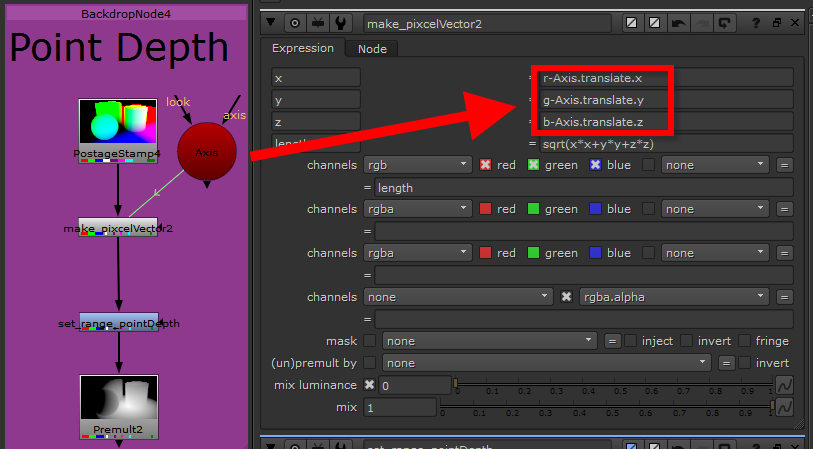
任意のポジションからのDepth
これは奥行きDepth01の応用です。
カメラのポジションを任意のポジションに変えてあげるだけです。
Axisノードを使用して、それのポジション情報を使用すれば3D空間上で位置決めが楽になります。
奥行きDepth02
最後に線形のDepthです。
数学の知識が無いとなかなか難しいですがチャレンジしてみてください。
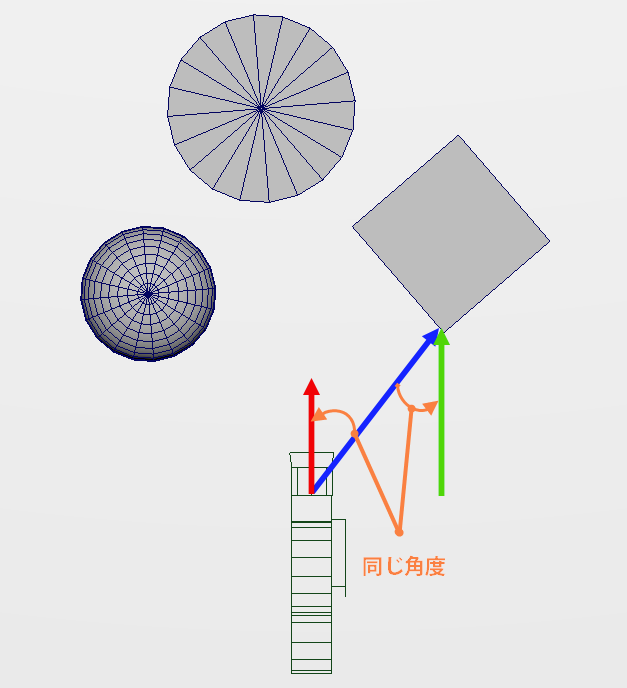
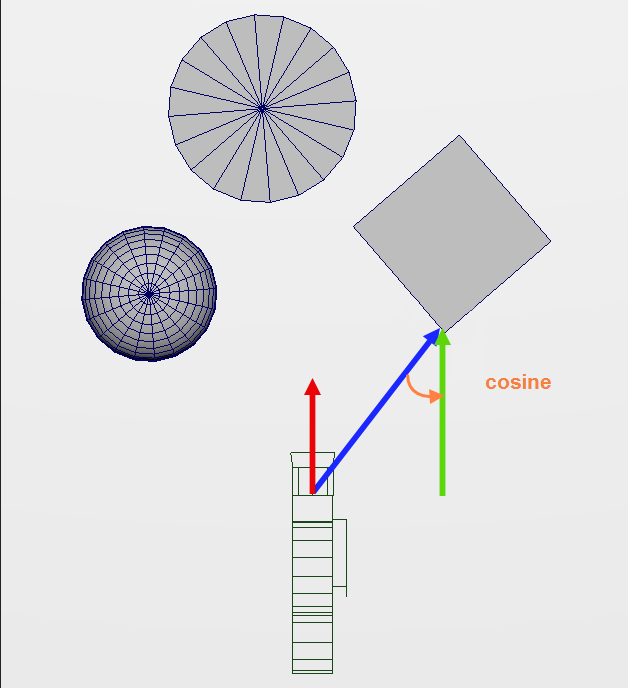
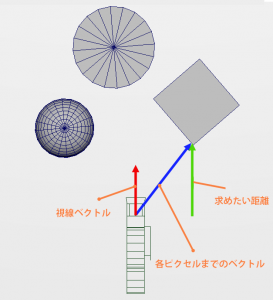
下図の緑のベクトルの長さで、これを求めるにはその他にカメラから各Pixelまでのベクトルと
カメラからの視線ベクトルが必要です。
この2つのベクトルを利用して、ベクトル間の角度を求め
三角関数のcosineを使用すれば緑のベクトルを求めることが出来ます。
では実際にNukeでの操作を見て行きたいと思います
2つのベクトルを作成
まず2つのベクトルを作成します。
1つめがカメラから各Pixelに向かうベクトルで、各Pixelの値からカメラのポジションを引き算することで求められます。
![]()
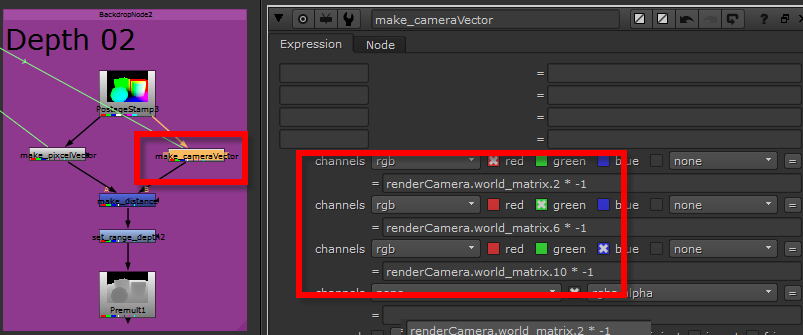
2つめがカメラの視線ベクトルです。
カメラの視線ベクトルはアトリビュートのWorld Matrixの部分から作成することができます。
そもそもカメラベクトルは(0, 0, -1)とZがマイナスなので、視線ベクトルとしてはマイナスを掛けてあげる必要があります。
式はMatrix × Camera Vectorです。
ちょっと難しく思うかも知れませんが、下図のMatrixの値に-1を乗算してあげることで作成できます。
エクスプレッションにはこのように書きます。
※ここではあえてカラー値にしていますが、そのまま計算式として入れてしまってもいいです。
マイナスに変換したのは2つベクトルの方向を合わせるためです。
1つ目のベクトルの計算を”カメラのポジション”から”各Pixelの値”を引くように
計算式を変更しても最終結果は同じになります。
2つのベクトルのなす角を求める
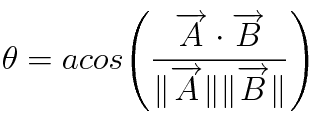
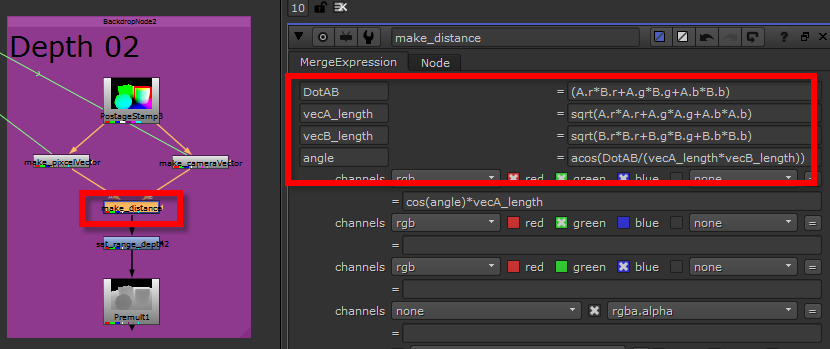
2つのベクトルの間の角度は下記の計算式で求めることが出来ます。
これをNukeのExpressionノード表現すると下図のようになります。
ベクトルの長さを求める
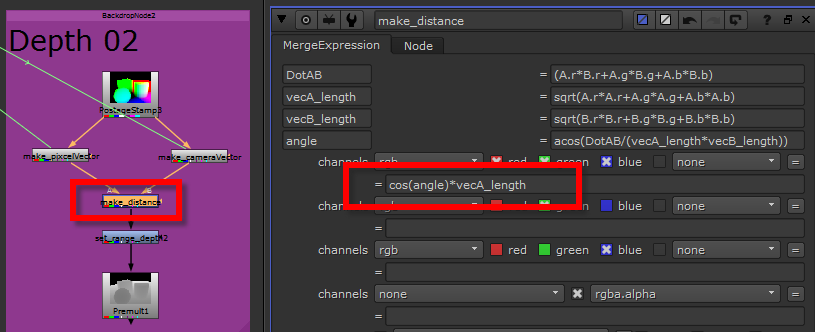
上の式から求められた角度と三角関数のcosine、カメラから各Pixelに向かうベクトルの長さの3つを
使用して、最終的なDepth値を求めます。
こんな書き方も
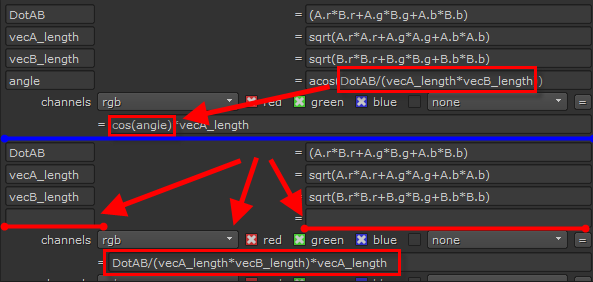
実は下記のようにacosとcosは打ち消すことが出来ます。
処理の流れとしては上の方がわかりやすいですが、わかってしまえば下の方のが計算処理が
速くなるので状況に応じて使い分けてください。
レンジ(Near,Far)の調整
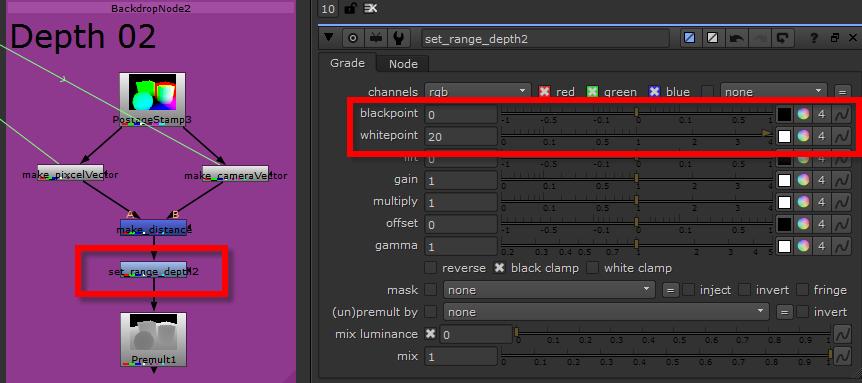
このままでは、単純に3D上での距離が入っているだけですので
gradeノードを使用して、レンジ(Near,Far設定)を設定します
以上で完成です。
Position Passは工夫すれば色んな使い方ができて、なかなか面白い素材です。
カメラの情報等別途必要になる物も有りますが、頑張って素材のHeaderに埋め込むなど
してしまえば、カメラの情報が無くても何とかなったりします。
ぜひ、皆さんも活用してみてください。
※免責事項※
本記事内で公開している全ての手法・コードの有用性、安全性について、当方は一切の保証を与えるものではありません。
これらのコードを使用したことによって引き起こる直接的、間接的な損害に対し、当方は一切責任を負うものではありません。
自己責任でご使用ください。






Posted at 2016.11.15 14:58 by とんとこ