Naiad飛沫
2012/4/26
お久しぶりです。開発の吉田です。
桜は散ってしまいましたが、皆さんは花見出来ましたでしょうか?
DFの花見はなんと300人ぐらいで、暖かいいい日に行えました。
さて最近の自分はシミュレーションを毎日行っています。Massive は基本シミュレーションですが今回ショット作成のフローが似ているNaiadを紹介したいと思います。
Massiveと似ている?群衆とParticleが?Massiveのフローは少ない人数で動きを設定し、ある程度満足する動きになったらいっぱい複製してコマンドラインでシミュレーションします。
Naiadも同じで、エージェントではなく、Particleを使って行います。
Naiadを簡単に説明:
Naiadをまだ触っていない方に軽く説明しますと…
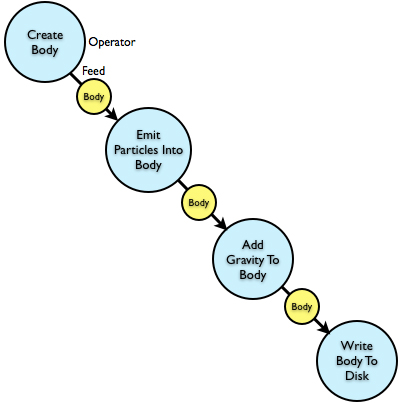
シミュレーションのデータはBody(ボディー)といい、NaiadのノードはOperator(オペレーター)といいます。OperatorでBodyを発生、変形、消したり出来ます。上記の図の青い部分がOperator。Operatorはシミュレーションの設定を行う場所です。黄色い部分はBody情報で、どのようにBodyが変化したかの情報を確認出来るところです。
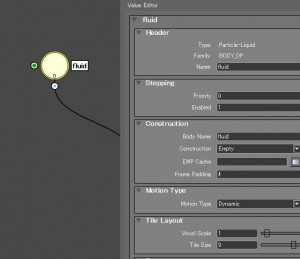
Operatorを選択し、下記のようにノードのパラメータが表示されます。
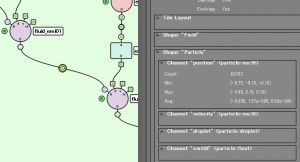
Bodyを選択して情報を確認出来ます。下記の図を見ればEmitterから43,782 Particleが出ていることが分かます。
BodyとFieldの中でも色々な種類があり、一つずつ説明するのは時間がかかるので後でグラフを見せながら少し説明します。Scopeはデータをビュー上で表示するためのノードになります。
最後にグローバル値を設定するためのOperator

たとえば全体のVoxelを細かくしたい場合、このOperatorで設定します。
Body毎にVoxelを設定した場合、グローバルではなく、その他のOperatorを選択し、設定できます。
流体シミュレーションに関して:
Collision(衝突計算)はオブジェクトその物ではなく、Volumeで行っています。
Volume情報がない物は計算行いません。
最初からVolume情報を持っている物はこちらになります:
1.Volume
2.Rigid-Body
3.Particle-Liquid(Mayaで言うところのFluid的なもの)
4.Field-Gas/Smoke/Fire
情報がないのは:
1. Mesh
2. Particle
※Meshは必ずVolumeに変換する必要があります。
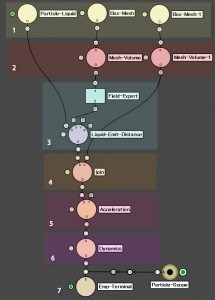
上記の図はノードのグラフを作る流れのベースになります。
※違う物もあります。
1.最初にParticle、Liquid、Meshを作成または読み込みます。
2.必要なデータをVolumeに変換します。
3.Emitterを設定します。
4.VolumeをJoinでまとめます。(⑤に影響させたくないVolumeを⑤の後にJoin)
5.Force(力)を与える、たとえば重力。
6.Dynamics Operatorを通します。
7.Terminal(終了ノード)またはWrite(書き込みノード)で終了です。
3つのシミュレーションファイル(.ni)を作るケースが多いです。
1. ベースのシミュレーション
2. ①を使ってMeshを作成
3. ①か②を使って細かいSplashを作成
※ ②を作らないケースもあります。
シミュレーションの注意点:
Collision用オブジェクトからParticleがもれる。
これはなぜでしょう?前述の通りMeshその物にはCollision出来ません。1回Volumeに変換する必要があります。その変換の設定によってはVolumeに問題が出たりします。
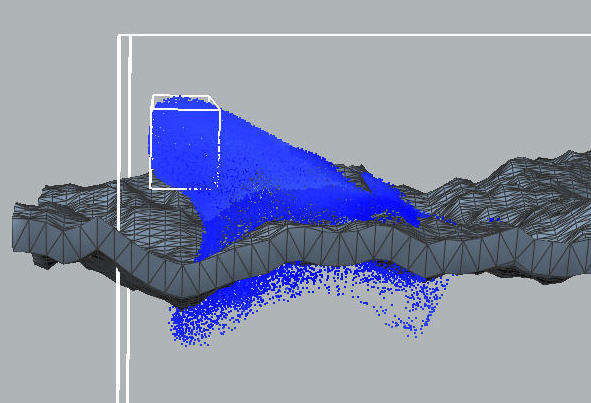
それを確認するためにScopeを使います。Scopeはデータを表示するためのノードです。
Iso-ScopeとTile-Scopeを下記のようにつないでMeshのVolumeを確認します。
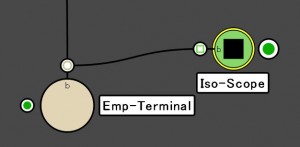
Iso-ScopeでCollisionで使われているVolumeが見れます。
Voxel ScaleやTile Sizeが足りない場合、Collisionオブジェクトに穴が開きます(下記の図を参考ください)。
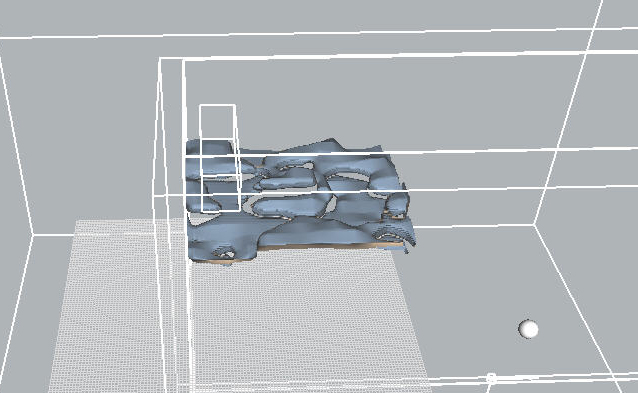
MeshVolumeやGlobalのTile Layoutを下げたり、MeshVolumeのThicknessを変えてください。

Globalの値を修正する場合、すべてのVolumeが細かくなりますが、シーンも重くなるので注意が必要です。
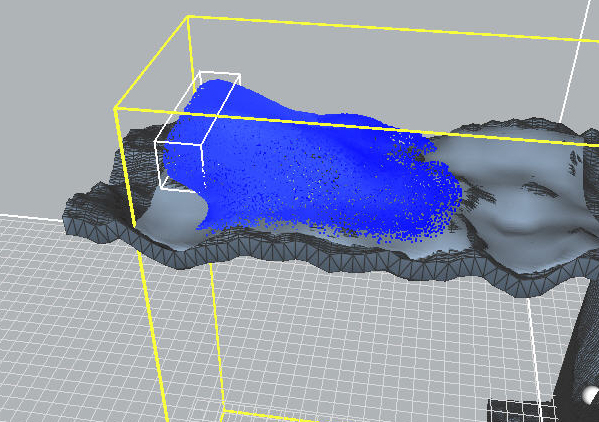
上記の図は修正後のVolumeになります。穴が全部消えて、Particleがもれなくなりました。
NEL:Naiad Expression Language
Naiadを使っていくとちょっと複雑のことをやりたい場合、NELを使う必要があります。
たとえば、2つのViscosity(粘性)のParticleを混ぜたい場合とか
Naiadでは1つのFluid Bodyしか扱えません。ではどうやって2つのViscosityを作るか?
それはEmitterIDを使ってNELで処理します。
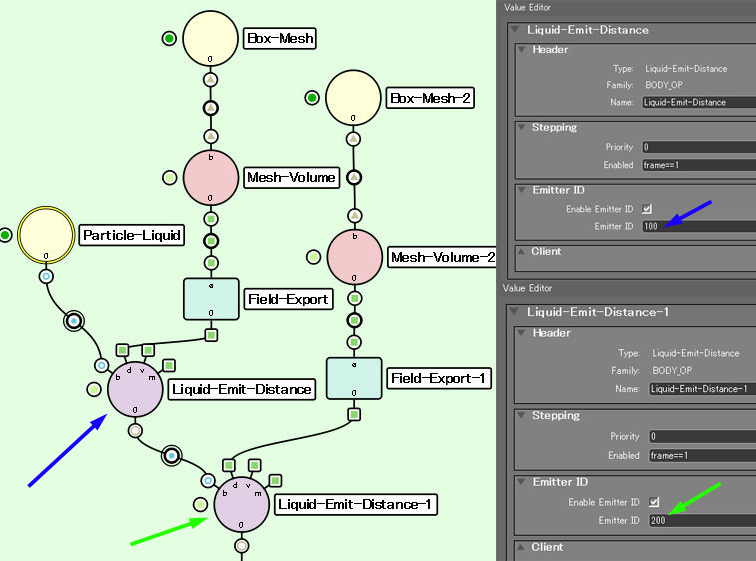
最初に2つのLiquid-Emit-DistanceノードのEmitter IDをチェック入れてID番号をつけます(下記の図を参考ください)。
次は3つのParticle-Nel-Channelノードを使ってviscosityを設定します。
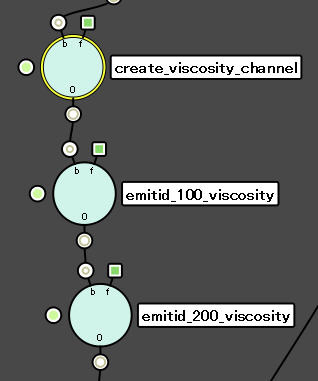
最初のノードでviscosity channelを作成します。
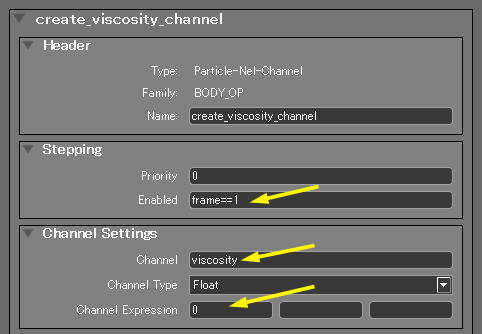
上記の図を訳しますとフレーム1でグローバルviscosityを好きな数字に設定します。
今回は0。
次の2つのノードを使ってemitterID毎にviscosityを個別に設定します。
下記の図はemitterID_100_viscosityのNEL.
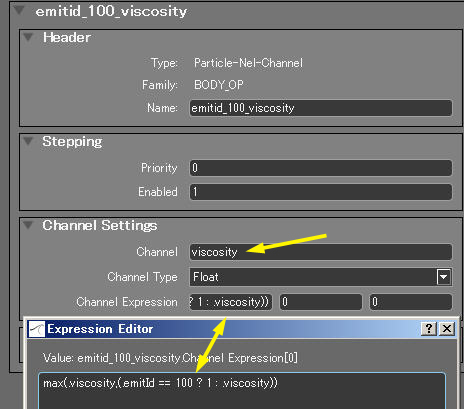
NEL コード:
max(.viscosity,(.emitId == 100 ? 2 : .viscosity))
maxのexpressionは2の値の大きい方を返します。
2番目の値はemitIDが100の場合は2、それ以外はグローバルのviscosity
emitterID_200_viscosityのNELをちょっと変えてください。
NEL コード:
max(.viscosity,(.emitId == 200 ? 500 : .viscosity))
今回maxはいらないですが、値をこれ以上下回りたくない場合、このような書き方があると知ってた方が便利です。
この段階で(Naiad)でシュミレーションしても何にも換わりません。
なぜでしょう?Maya的に説明しますとattributeを追加しましたがまだどこにもつながっていない状態です。ViscosityをFieldに変換しないといけません。
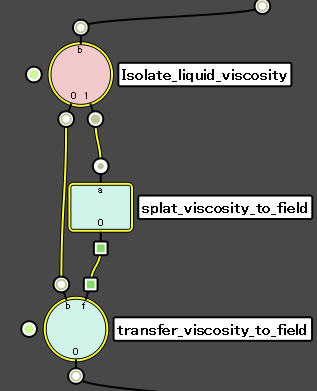
上記の図を説明しますと
IsolateノードでParticleのBody情報だけをゲットする。
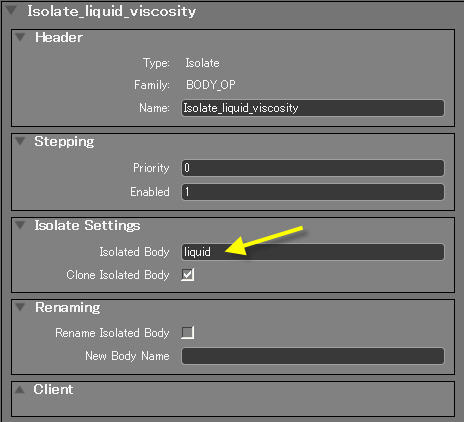
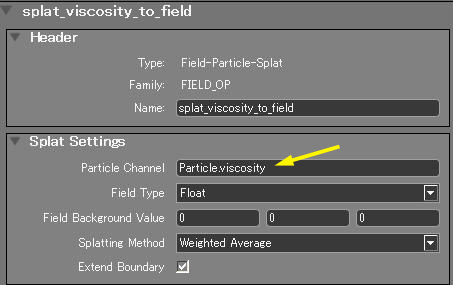
Field-Particle-Splatノードで作ったviscosity channelをfieldに変換する。
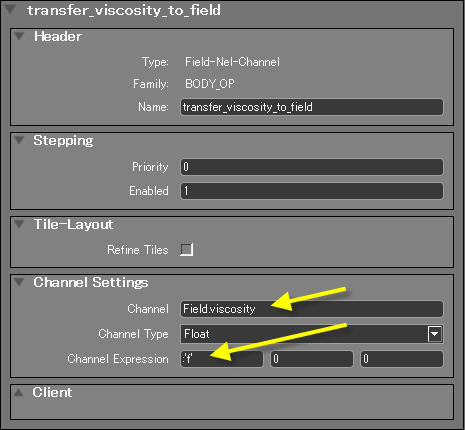
Field-Nel-ChannelノードでField.viscosity channelに変換したfield情報をつなぎます。
Expressionは:’f’です。
これで一通りの流れが完成です!結果はこんな感じです。
この他にもRigidBodyやSplashの設定などまだまだ色々ありますが今回はこの辺で終了したいと思います。
Naiadのサンプルはウエブにいっぱいあるのでそれを見ながら勉強すれば早いかと思います。
最後にExotic MatterのMarcusに今後どのような機能がNaiadに入るかを聞きました。
場所によってHighResに出来る機能は今後入るようです。
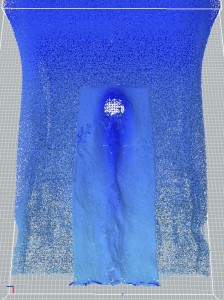
では
________________________________________________________________________
English Translation
________________________________________________________________________
Hello,
I am Takashi Yoshida, the Crowd Supervisor here at Digital Frontier. I also help with TD work from time to time.
Lately, it feels like all I have been doing is simulation.
Massive shot work seems similar to Naiad workflow in a way.
Crowd and Particles similar you say? Well, simulating with few numbers to get the feel and direction of the animation, then bumping the number up to some crazy amount that looks good:)
General explanation about Naiad:
(Intended for those who have not used Naiad, so this portion can be skipped.)

Simulation data is called a “Body”, and nodes in Naiad are called “Operators”.
Operators are used to create, change and delete Bodies.
The above Graph shows in blue, the Operators. Operators are places to set parameters for a simulation. In yellow are Bodies, places to get information on how a simulation has changed by the previous Operator.
Selecting an Operator will display something similar to the image below.
The Parameters will be shown in the Value Editor.

Selecting a Body will display information about a simulation in that location.
In the below Graph, the emitter has created 43,782 particles.

As for Operators, there are roughly 3 types.
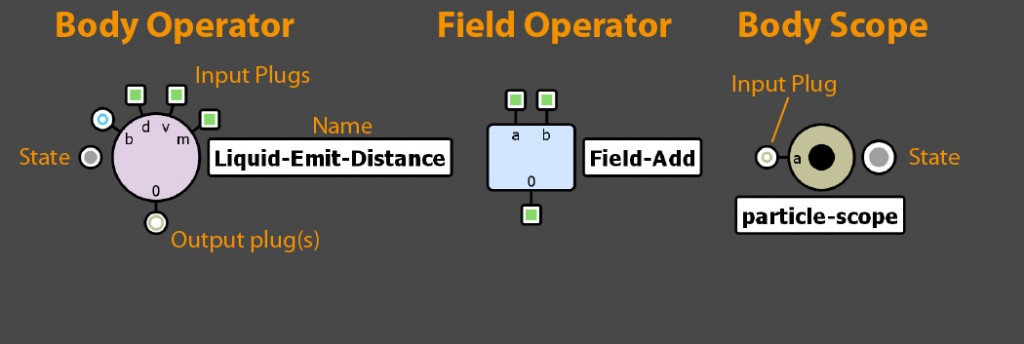
If I were to explain all the various Body and Field Operator types, it would take a while.
So I have opted to explain this in sort a little later in the article.
Scopes are used to display/view simulated or simulating data.
Lastly, there is a Global Operator that is used to set global parameters.

For example, if there is a need to make all the Voxels in a sim more detailed, the Global Operator is the place to do it.
When setting Voxel Bodies individually, all that needs to be done is to select the Operator and make changes there, not globally.
Simulation:
Collisions are calculated via Volume, not the actual object itself.
Collisions cannot be calculated without Volume information.
Here is a list of objects that already have Volume information to start:
1.Volume
2.Rigid-Body
3.Particle-Liquid(Similar to Maya’s Fluid)
4.Field-Gas/Smoke/Fire
Objects that do not have Volume Info:
1. Mesh
2. Particle
Note: Mesh will always need to be converted to a Volume.

The above graph shows a basic node network.
(Networks can be different than the above graph.)
1.Liquid & Mesh Operators are created and if needed, read in.
2.Convert required data into Volumes.
3.Emitter setup
4.Join the Volumes
(If there is a Volume that does not want to be affected by 5’s acceleration, the Volume can be joined after the acceleration node.)
5.Apply a force, for instance gravity.
6.Input into the Dynamics Operator.
7.Use a Terminal or Write Operator to finish.
Frequently, 3 simulation files (.ni) are created
1. Base Simulation
2. Mesh Creation given first sim’s data
3. From 1 and 2 create a splash simulation
(2 can be skipped)
Simulation Tips:
When Particles are dropping through a Collision object…
Why does this happen? As explained previously, Mesh objects cannot be used to collide. Meshes need to be converted into a volume. Depending on the Volume settings some problems can occur.

Scopes can be used to check for problems in a Volume. Remember, Scopes are used to display Volumes.

Use the Iso-scope to visualize the volume used for the collision by making the connection above.
If the Voxel Scale and Tile Size are not detailed enough, holes will appear in collision object’s volume (as seen in the graph below).

To get rid of the holes, lower the MeshVolume or Global Tile Layout.
Also, adjusting the MeshVolume Thickness may solve the problem.

When changing the Global Settings, all the Volumes will become more detailed.
This will cause the sim to become heavier, so caution is needed when adjusting global settings.

The above image shows the Volume after adjustment. The holes are all gone and there are no longer particles leaking through the object.
NEL:Naiad Expression Language
Trying to do some complex sims in Naiad, it will most likely require the use of NEL scripting.
In this case, I will explain creating 2 viscosity types and mixing them together.
In Naiad, only one Fluid Body can be solved for Dynamics.
So how to go about creating 2 different viscosities?
This can be done with EmitterID and a little bit of NEL.
After creating a node graph similar the one below, make sure the Liquid-Emit-Distance node’s Emitter ID’s checkbox is checked and each one has its own unique id.

Use 3 Particle-Nel-Channel nodes to set the viscosity.

Select the first node and create a viscosity channel.

To explain the image above, at frame 1, viscosity is set to 0.
In the next 2 nodes, two different viscosities are set given their emitterID.
The NEL for emitterID_100_viscosity is shown below.

NEL code:
max(.viscosity,(.emitId == 100 ? 2 : .viscosity))
“max” means the bigger of the two.
The second value for “max” means, if emitID is 100 then it is two, otherwise it is the global viscosity.
emitterID_200_viscosity’s NEL is just a little different.
NEL code:
max(.viscosity,(.emitId == 200 ? 500 : .viscosity))
This time around there is no real need to use the “max”.
But I just wanted to show a way to limit what the viscosity value can go under.
Simulating at this point, the particles viscosities have not changed.
Why is this?
To explain in Maya terms, attributes have been created, but none of the attributes have been connected to anything yet.
The Viscosity needs to be converted into a Field.

To explain the above graph,
The Isolate node is used to get the Body information of the liquid.

The viscosity channel is converted into a field using the Field-Particle-Splat node.

The field information is now connected to the Field.viscosity channel.
Expression is :’f’.

So the setup for the viscosities is complete, all that need to be done is to output to a Join node or whatever other calculations that are required.
The result is something like this:
RigidBody or Splash settings are other things that can be done in Naiad, but today, I will end it here.
There are many great Naiad samples on the web which are a good way to study up on Naiad.
Hope you enjoyed this article.
Cheers!
コメント
コメントフォーム